T’ian’an district was once a jewel in Paikang city, with large gardens, temples and buildings of great architecture. Now everything lies in ruin. Citizens, mad with corruption, is tearing down their homes and freeing caged wildlife onto the streets. Armsmaster Uxus, who is charged with keeping the peace, has succumbed to madness and decided to cleanse the city with fire. But in the middle of chaos and evil there is also a force of good and pure; a priestess of T’ian abides in the district, and will aid the heroes if needed.
T'ian'an is a time trial dungeon, to complete it you have to kill the first 4 bosses in 16 minutes and 45 seconds, in the following order:
Boss1: Ironwright
Boss2: Juxia the Berserk
Boss3: Shadowmaster
Boss4: Yi-T’ian
Strategy[]
Team Setup: 2xTanks, 2xHealers,1xRogue,1xMage
You need a Rogue with TW at the final boss, Soldiers need Resolve in almost all fights.
Notes on gear: T'ian'an is a Endgame group dungeon, Showing up in this dungeon with T2 raid gear is not acceptable on any class, and you will find yourself on ignore lists if you do. Khitai dungeon gear is minimum to attend this dungeon in a PUG, if you want to be carried then ask your guild to do so.
Getting to the First Boss:
Before Running make sure all your team members have Dash on their hotbar and know how to use it.
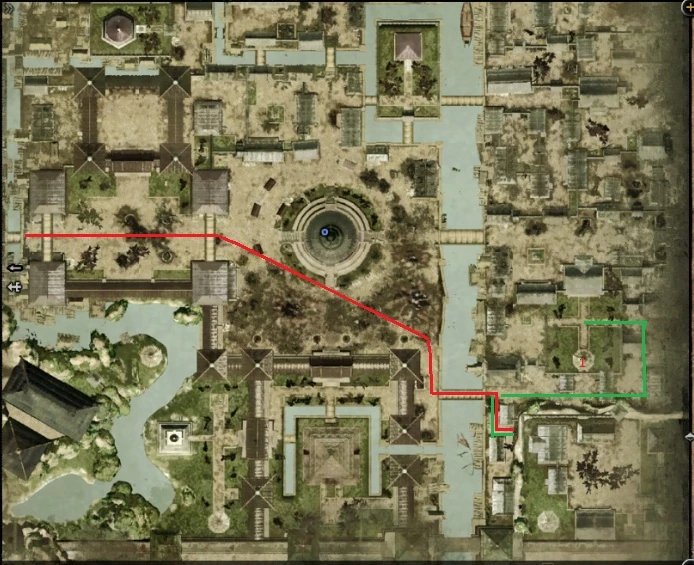
You start at the left side, follow the red line and run/sprint as fast as you can kite all mobs, behind the building where the red line end you reset the mobs, when all mobs have been reset you continue on the green line and kill the 7 mobs at the end. Then the boss is just South of your position.
The posetive with this route is that it's very easy, and only involves killing 7 normal lvl 85 mobs, while a conventional route includes killing close to 50 mobs. Most teams doing the normal run straight through the center usually spend atleast 1m40s to get ready to fight the first boss, only the very hardcore teams will do much better than that. If you take the route above you also only spend 1m40s, which is very good considering how easy it is, and there is zero chance for wiping or anything else going wrong, which there is a high chance for if you go through center with a average pug.
Ironwright[]
Ironwright is the first boss, He switches between having Anticipate and Mirrored Shield. He also stacks his Concentration buff over time. At 3 stacks it does +20% damage and +2000 Health Regen which is bad, but at 5 stacks it does +100% damage, and 12000 Health Regen. You don't want the boss to gain 5 stacks of Concentration.
Whenever he switches between Anticipate and Mirrored Shield he resets his Concentration stack, so when he reaches 3 stacks it's important that you force a switch.
There are several ways to trigger a switch, if the boss currently has Anticipate buff on, then the Main Tank who has aggro should run far away from boss to trigger his mega stun(Hammer Throw), as the stun will force boss to switch to Mirrored Shield. Tank should use Forced Engage and then leg it, to make sure offtank or a dps don't interfere.
If the boss currently have Mirrored shield, then a player can use the forge and gain a buff that can break the shield and force a switch(this only works with melee weapons and not magic cast damage). Use the forge and debuff the boss 3 times to force the switch.
Mages can also use the Forge to gain a 150% Damage increase buff.
Soldiers need to remove Wreck Armor with Resolve.
Tips:
- The most hardcore way to kill this boss is to charge him while he's inside the hut and burn him down before he reaches 5 stacks of Concentration.
- The strategy used in most Youtube videos is to pull the boss out from the hut with irritate and then force the boss to switch to Mirrored Shield, and when Concentration reaches 3 stacks, then use the forge to reset the stacks and then kill the boss before he reaches 5 stacks again.
The problem with the strategies mentioned above is that they require the group to burn the boss down with 4-5 stacks of Concentration, and most PUGs will struggle with that.
The best casual method to kill this boss is probably:
- Charge the boss while he's in the hut, and start burning him down with Anticipate buff on, when he reaches 3 stacks of Concentration, the tank uses Forced Engage, and sprints towards the entrence, he will then force a stun and the boss will change to Mirrored Shield buff, Concentration will be reset. Continue to burn him down, when the boss reaches 3 stacks of concentration again, a dps goes to the forge and hits the boss 3 times with the forge buff in melee, or untill the Concentration buff is removed. The boss needs to die before another 3x stacks of concentration or your seriously running low on time.
- Mirrored Shield deals damage back to the casters, it can be a good idea to limit the time this buff is up if your heavy on mages/magic damage and they take massive damage which limits the dps they can do on the boss. The way to do this is to use the forge on the boss instanly when he changes to Mirrored Shield buff to get it back to Anticipate .
Juxia the Berserk[]
The boss is a big Rhino lcated in what looks like a Zoo, It's mostly Tank and spank, some frontal damage so dps should stay on the sides or behind the boss, the boss will run away and release a caged animal that need to be tanked and killed. Soldier need to remove Wracks with Resolve. The Boss resets the hatelist on his Impale cast, it's important that the main tank saves some of his taunts for this, like Irritate for example.
- Impale: Resets Aggro and knocks the tank down.
Shadowmaster[]
Spawn boss by interacting with the poster in the room.
Shadowmaster is a Assasin Boss, he does decent damage and tanks need to switch aggro, his bossroom consists of two floors in his building, when he disapears the team must change floor as fast as possible, and destroy/dps the shining object on the tables on the other floor to force the boss to spawn, the boss heals when hidden. Other than that it's just tank and spank.
Yi-T’ian[]
Yi-T'ian is the last of the time-trial bosses. He places fire areas around his courtyard, just don't stand in the fire.
Only tank should be infront of the boss, rest should be behind him to avoid frontal damage.
- Haymaker: Powerfull frontal cone attack, tank should try to avoid it by moving away or to sides.
- Cocktail: More fire on the ground, move out of it.
- Berserk: It's a enrage, he will start charging for a water barrel and stuns+damage players he runs over, all players should move away from him when he starts to cast it, one player should run up to the barrel he aims for and destroy it when the boss arrives as the water will remove the enrage.
Armsmaster Uxus[]
Uxus is the final boss in the instance, in the room there are lots of yellow trash mobs,two doors, and many piles of wood.
Kill the trash, and the boss will spawn from the right door, during the fight the boss will spawn adds on a timer at the two doors. Tank and spank the adds. While Uxus has his helmet on he can't be damaged as long as he has stamina. When you deal damage to him you only burn Stamina. When he reaches Zero stamina he spawns the second add, takes off his helmet, and at this point he is no longer immune to damage when he has stamina.
However when he don't have helmet on he regens Stamina, so what you want is to prevent him to get 100% stamina again so he don't put on that annoying helmet again. To do this bring him to the piles of wood and set them on fire, the fire will drain Stamina from him preventing him from reaching 100% stamina and putting on helmet.
When he reaches about 50% stamina you take him to a new pile of wood, and set it on fire, and that will take him down to 20% Stamina again.
When he uses Regenerative Elixir, the rogue must remove it with his TW ability or he heals up.
Loot: Bolts of the Armsmaster, Tigerstrike, Wolf Snarl, Wings of Salvation, Ouroboros Ring